Porch railing repair can get expensive fast. Add that cost to the other job that is likely, porch painting, and it may become downright prohibitive! Fortunately, with a few simple products, you can fix your rotten spindles, and even those expensive cedar top rails, without too much skill or effort.
Older porches are often made out of western red cedar -a naturally warp and rot resistant (never rot proof) wood grown in North America. This is a good choice of material, yet many porch railings are constructed by quick moving builders who do not take the extra time to make the little adjustments that will allow rain, snow melt, and dew to drain properly.
Water standing for any period of time on paint and wood will lead to the eventual decomposition of both materials. The railing repaired in this post is about twenty years old, just about the amount of time I would expect above ground, western red cedar to last when not draining properly.
 |
| The porch being repaired |
This house has been
undergoing many exterior repairs, including new doors, sill rot repairs, window rot repairs, replacement decking, new stairways, and a new paint job. Some of these repairs were necessitated by the simple non-adherence to good sense carpentry, some are from manufacturer defects (windows), and others simple time and weather. Below I will go over techniques for repairing the top accent rail seen on this house. These same techniques can be used to address rotted top rails and even windows!
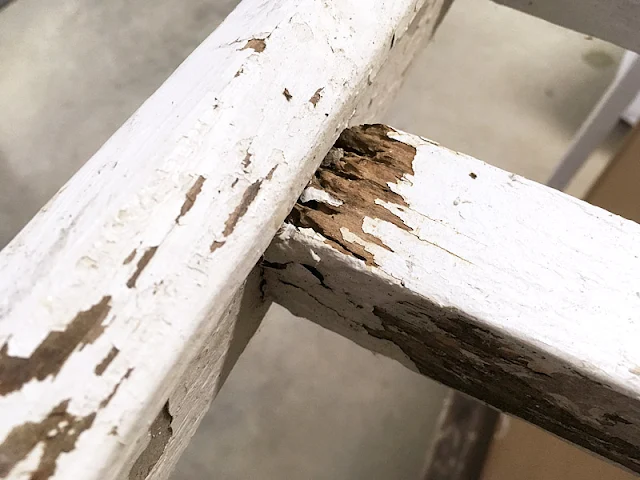 |
| The lower portion of a porch railing is where much of the decay can be found. |
Wood placed against wood will hold moisture and eventually decay, even when painted. In fact, the rotting wood will undermine the surface coating leading you to notice the rot. Rotted wood is soft, sometimes crumbly, sometimes green with algae, and sometimes even releases moisture when pressed. This is quite likely to happen where the spindles meet the bottom rail, particularly at porch corners where they receive rain from two sides. A spindle's end grain will wick moisture up into the wood.
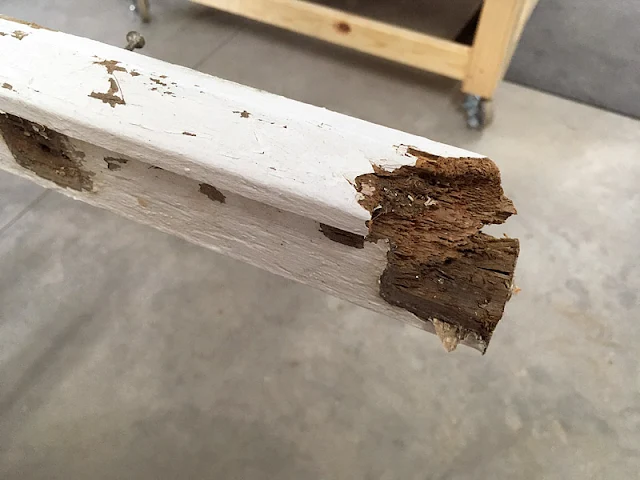 |
| End of the porch bottom rail |
Another prime spot for decay is the bottom rail, particularly at the porch corners. Water running down the porch corner posts and spindles attached to it collects at the bottom rail. The rail's end grain wicks moisture into the rail and the spindle also wicks moisture up into itself, holding it against the bottom rail. This double whammy of moisture will rot the bottom rail from the side and the top!
 |
| Accent rails and spindles at the top of the porch |
Accents at the top front of a porch tend to not rot -they don't see much rain, but side accents see sun and rain on the south side and on the north side, may never dry out for lack of sun. These two sets of conditions lead to rot! Although many are familiar with shady, damp north side of a house, some people are surprised to hear that a full day of sun can lead to decay as well.
 |
| Accent rails that have been repaired, primed, and are awaiting their new spindles |
For this tutorial I will show you how to fix the porch railing using the accent rails as an example. The process for fixing the lower railing is exactly the same, only with longer spindles.
The first step, of course, is to take your accent rails down. They are typically installed with
phillips head screws above and possibly finish nails or phillips screws into the porch posts. These should be fairly easy to remove. If nails are used, or screws spin but do not come out, you can use a pry bar -but this may do some damage. Its better to use a tool like the one shown below.
 |
| Feintool Multimaster |
The Feintool Multimaster is my home repair go to powertool. If you do any home repair, this tool is a must have. There are lower cost brands, of course, but I trust the Feintool. You can use the metal-cutting blade shown below to slice through soft nails and even hard screws. Be aware that the hard screws will wear your blades much faster than nails.
 |
| BiMetal Blade. You can use it on wood, but it is designed for metal cutting. |
The only drawback to a Feintool Multimaster, or any oscillating tool, is the cost of blades. Buy them in bulk to save a few dollars, protect them in your kit, and use them wisely to save on wear and tear.
 |
| The lower portion of a porch railing is where much of the decay can be found. |
Once you have the railings down you can take them apart. If they are really rotten, it will be easy to separate the spindles from the bottom rail -typically attached with 16-18 gauge brad nails applied with a pneumatic nail gun. These nails are soft and flexible. To protect the bottom rail, you can use the oscillating cutter to slice through these brads.
The top board, typically a 2x4, is usually connected to the spindles with phillips head screws. These should be easily removed with a cordless drill and phillips bit. I do not expect the top board to need to be replaced. The bottom rail, a more expensive milled piece of cedar should be saved if it is not too far gone. I'll show you how to fix it, below.
 |
| Feintool Multimaster oscillating tool with sanding pad attachment. |
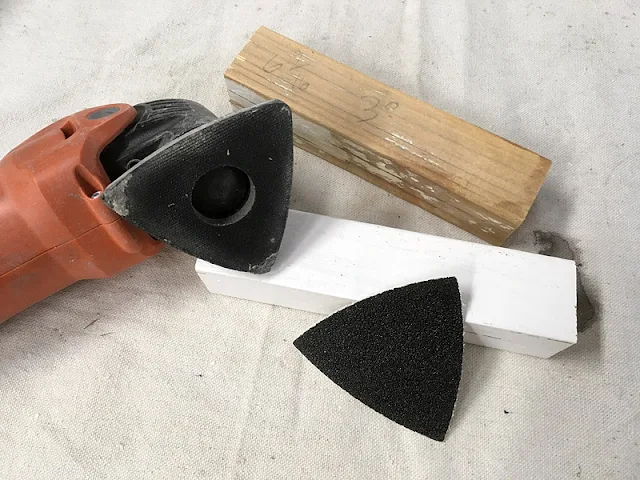
I go to my Feintool Multimaster and sanding pad attachment to quickly
remove loose paint on any railing pieces I plan to re-use. The sanding pads come in boxes of 50 in all grits. I use 60, 80, or 120 grit to remove paint on these pieces. These Velcro attached pads are relatively long lived, but their most valuable feature is the ability to rotate the pad to help with difficult corners.
 |
| Basic spindles are cut lengths of 2x2 cedar. Typically these are surfaced, meaning smooth, and are actually 1.5x1.5 inches |
I aim to replace all of the spindles, rotten or not. Why? Because the spindle is the lowest cost piece of the railing and, at only 6.5 inches or so, they allow me to get several spindles out of one piece of 2x2 western red cedar. You can buy 8 foot lengths of 2x2 cedar at your local box store or lumber yard, but it may be even easier to find pre-cut western red cedar spindles of 36-42 inches in length. Lastly, the part of the repair that ensures a longer life railing requires another 1/4 of an inch in length. So, if your spindles are in good shape, and you do not mind shortening them, you can re-use as needed. Otherwise, I recommend purchasing a few new lengths of 2x2 western red cedar.
A word about choice of wood: you may be tempted to buy
treated lumber for any or all aspects of your repair project. I firmly reject treated wood, typically pine, for porch railings. Why? It simply is not stable enough. Where I was asked to use it, it has twisted, pulled screws or nails, split, and has molded on the surface where not painted. Painting it is also a problem, often requiring an adequate drying time before a coating can be applied. In that time, the drying process has twisted or warped the wood. It's simply not good for this forward facing part of your home!
 |
| A simple, useful tool -the miter saw. You will not need a fancy one for this job. |
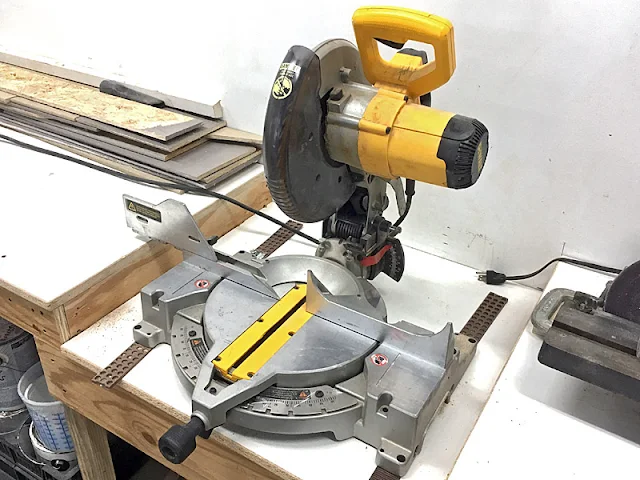
You will need a
miter saw for this repair. For spindle cutting, it does not need to be the costliest machine available. What I am using here is a 10" Dewalt single bevel miter saw, generally a solid cutting tool. You may also use the smaller 7.25-8.5 inch bladed models. This part of the repair can even be done with a hand-powered miter saw! After all, western red cedar is fairly soft and easy to cut. Your blade should be sharp and, if you cut slowly, a 40 tooth blade will work just fine.
The first task is to cut your spindles a wee bit longer than needed. If 6.5 inches is required, then cut each to 6.75 inches. This leaves room for your miter cut. This is important because it is this miter cut that will spare you the rot returning as quickly as it had the first time!
 |
| Make sure that your stop, a device that allows all cuts to be the same length, is square! |
Now that you cut all your needed spindles to 6.75 inches it is time to make your final cuts. To ensure that all cuts are exactly the same length, we clamp what is called a stop to the back fence of the miter saw. This can be done on any type of power or hand miter saw. I've used a piece of 3/4 inch thick plywood that I checked for square (see picture above) and ensured that it is mounted flat to the miter saw fence and table.
 |
| Measuring accurately is important. -the blade tooth lands squarely on the 6.5 inch line. |
Measure to ensure 6.5 inches from the stop to the right of the saw blade (or left, if you are working from the other side). After measuring, affix the stop with a
C-clamp to hold the stop firmly in place -then measure again to make sure it didn't move.
 |
| A combination dust mask and face shield. |
Before making your cut, be safe. Wear safety glasses and a dust mask, or what I prefer -a full face shield with lung protection. It offers better dust protection and full face projectile protection. The above is a 3M model with exchangeable filters for a variety of pollutants and a silicone seal that is remarkably comfortable given its level of protection. Honestly, I wish I bought one of these 20 years ago. Protect yourself!
 |
| Note the subtle angle, about 4 degrees from square. This little bit of work will spare your railings! |
Now you are ready to move the miter position about 4 degrees away from the spindle (to the left in this example) and lock it in place (usually by turning the knob). Place a precut, 6.75 inch spindle between the stop and the blade, holding it firmly with hand closer to the stop than the blade. Get the blade up to speed and pass it slowly through the cedar spindle. Hold the saw down while it slows to a stop. This will protect the wood from tear outs and splinters while protecting you. When you raise the saw blade you will see a slight angle on your spindle.
This angle gives the spindle a length of 6.5 inches on one side and about 6.625 inches on the other. This little bit changes everything. An eighth of an inch over the spindles' 1.5 inch width is the same slope as a 1 inch drop over 12 inch length. It is the reason the bottom rail will now drain water instead of hold it!
So is that it? It could be, or you can take rot resistance to the next level. Read on...
 |
| When applying epoxy, use a throwaway chip brush and container. |
Since the accent rails (or hand rails) are disassembled, you may as well make a little extra effort before reassembly to protect the end grain that we know will wick moisture into the wood, causing rot. To do that, apply an easy to use two-part epoxy to seal the end grain. My preferred product is called Rot Fix, by System Three.
Rot Fix is low odor, has a simple 1:2 mix ratio of hardener to resin, and has some open time -meaning it will stay liquid for a few minutes or longer in cold temps. The only complexity of two-part epoxy is measuring ratios accurately. With throw away plastic containers, you can easily mark them up for proper measure. Just remember: one part hardener to every two parts resin. Easy.
Why not seal the end grain of sanded (or new) bottom rails while you are mixing some epoxy? It's a good idea because any end grain can wick moisture. It's a little added protection against future rot.
 |
| System Three SculpWood is a much better repair material than any box store wood fillers. |
It's possible that there will be some holes in the rail bottoms, either from nails or from rot. Make sure the railing pieces are dry to the touch, then scrape out any soft, crumbly wood. It is suggested that you coat all holes with liquid Rot Fix before
filling them with System Three's putty, SculpWood. You can add the putty
immediately after application of the liquid epoxy. SculpWood's mixture ratio is a simple
1:1. Simply scoop the putty resin from one container and the same amount of hardener putty from the other, mix them well and use a flat tool to spread the mixture.
 |
| Rot Fix epoxy putty is easy to manipulate and even easier to mix. |
This combination of epoxy liquid and putty,
after proper curing, is extremely tough, grips wood with tenacity, can be
sanded easily, and then be painted like any other wood. I couldn't repair my house in the woods without it! Use sandpaper sheets or bust out the Feintool and sanding pads to conquer this job quickly.
 |
| Make sure to pair up the right bottom rails and top boards. |
If you have taken down several sections of railings, its a good idea to match lengths up to ensure the rebuild goes smoothly. Because putty work and even paint can conceal the original spindle placement, you can use the screw holes in the 2x4 top boards to space spindles. Otherwise, you can measure railing that is still mounted to the porch and take that as the basis for spindle spacing.
 |
| When to paint is up to you -before or after assembly. After is probably best, although fussier. |
We are close to reassembly now that all our pieces are cut, epoxied, puttied, and sanded. As you can see, I have chosen to paint some pieces and not others. Because there was no fixing to be done on the 2x4 top pieces, those received primer and paint ahead of reassembly. The milled cedar pieces, or bottom rails (which are on top in this image), received epoxy on ends, holes were filled with putty, then sanded, primed, and all surfaces painted.
 |
| There are many nail guns out there, but I prefer 18gauge pneumatic guns. |
The bottom rail will be taking in brad nails to reattach it to the spindles. The brad holes, quite small, but visible, will get a bit of outdoor rated caulk and then paint. To accomplish this, I use a pneumatic nail gun with small compressor and tank. I've been using this Senco for at least a decade now without any issues.
 |
| The compressor and gallon tank came as a kit with the brad gun. |
Carpenters know
that a nail is often just a clamp holding things together while the glue
dries. Glue holds a lot of things together really really well, but in
outdoor carpentry, this is not usually the case. We depend on
outdoor rated screws for much of our fastening, although there are instances when screws are not palatable or functional. At these times, we rely on galvanized brads.
For this project, I use one 2 inch galvanized (reduces corrosion) brad
to fasten the bottom rail to the spindles. This single brad is used to hold the spindles in place before sinking the more functional, angled brad. This second brad is driven from the side of the bottom rail, upwards into the spindle to give the piece a modicum of downward resistance. These accent
rails are not intended to hold much weight, although that hasn't stopped many
people from hanging plants or other objects from them!
 |
| That slight angle seen where the spindle meets the bottom rail (at top, its upside down!) will help keep railings dry. |
There are different routes to reassembly. The best, if fussier, solution is to assemble all three components -top rail, bottom rail, and spindles
before priming and painting. Assembling first allows you to putty the brad holes, sand, then prime and paint the whole assembly. A little more time consuming, but possibly the longest lived solution because the brads used for assembly are concealed under the most paint and putty.
I haven't yet addressed how nails and screws can also lead to rot in porch railing systems. We often find some rot where brads pierce the bottom rails to attached spindles. As water accumulates on these rails where nails penetrate the the paint film, the water can travel the length of the nail, deep into the wood. Cold metal of nails or screws can also condense moisture out of the air, covering the metal with dew -inside the wood!
My solution is to angle the spindles to create a slope that reduces the accumulation of water. I add epoxy sealer to limit wicking of moisture deep into the wood. Finally, I prime and paint with a high quality, gloss paint to protect the wood from the destructive action of the sun and moisture.
 |
| I have paint preferences, but whatever you do, do not buy the lowest cost paint. |
I've been using Sherwin Williams paint for the last four years. I'm a fan of their Resilience line in satin or gloss. It's lower cost than their top of the line Emerald line and it has the same application temperatures down into the 40 degree range. What I truly like is Resilience's early wet time. The paint can collect dew after four hours of dry time. Here, in the woods of Minnesota, it gets moist at any given moment, rain seems to pop up out of nowhere, and Resilience hasn't failed me yet.
Emerald is a good paint, but when using it on a railing project, several days of rain beginning a day after I painted, despite protection with plastic, led to a failed paint film. I will only use Emerald when I am convinced it will be warm and dry for several days or when painting exterior items removed into the shop, as with this accent rail project.
Finally, I prefer gloss for porch railings -its tougher and I believe it is better at shedding water.
Addendum:
Because I mentioned that it is possible to use the very same techniques on the handrail as the upper accent rail, it's useful to add a few more images of the the handrail as there are some minor differences.
As you can see here, there is a screw sticking up through the bottom rail of the handrail structure. This screw is used to fasten the spindles from below. This is the opposite of the top accent rail that was covered in the above article.
The spindles on the handrail will be fastened with screws to the bottom rail -yes, the one that requires draining, Some of those screws can be seen in the above picture of the underside of the handrails bottom rail. The reason for this is twofold. The first is that brad nails would not be strong enough to resist downward pressure from things like someone's foot resting on that lower rail. The other reason is more subtle -the underside of the bottom rail is not visible so brads are not needed to conceal the fastening system.

The top of the handrail -the most expensive component, is not screwed into the spindles at all. It is brad nailed from above, diagonally into the spindles. The bottom of the upper handrail is milled as a channel. This channel accepts 2x2 spindles perfectly. It also provides outward and inward resistance to movement. Two brads are sunk as described to lock it in place -but that is about all they do. As you can see, screws are fasteners used where they are not visible, brads where visible. Brads are never used where strength is mandatory -that is unless the pieces will be glued, an unlikely practice in outdoor woodwork,


